

| Optimization using Genetic Algorithms | Defining Constraints | |
1.Before using Knowledge Builder, decide on how to approach the problem:
·Determine the numeric variable that you wish to optimize. This is normally the cost of a given solution and is either to be minimised or maximised. For example, you may wish to minimise production cost, or maximise revenues. If you require a variable to have a certain value then define the cost as the difference between the calculated and desired value and then minimise this cost.
·Determine the numeric variables (inputs) that affect the calculation of the cost variable.
·Determine the procedural calculations relating the cost variable to the input variables. These can be put into a Procedure type dictionary object.
2.If you are new to Knowledge Builder and your main interest is optimization, then you should have an understanding of the following topics before trying out optimization:
·Knowledge Builder attributes
·Knowledge Builder variables
·Knowledge Builder script commands
·Decision tree logic
·Reports
 Dynamic link libraries can be utilised to very good effect. As an alternative to using Knowledge Builder script commands to evaluate the 'cost function', the developer may prefer to use a programming language that they already know and use, for instance Pascal or C, to build their own DLL. The DLL can then be called using DLL commands for Knowledge Builder to perform the optimization. Similarly, OLE2 calls could be made.
3.From the Knowledge Explorer, right mouse click the Project category and select New | Knowledge Module then rename the new Knowledge Module appropriately.
4.Right mouse click the Attributes Category within this Knowledge Module and select New | List_Attribute. Rename the attribute to Optimal for the sake of this guide.
5.Double click the new attribute to display it in the Multiple Object Editor in the right pane on the screen.
6.Select Instance Properties using the tab on the right of the pane. Click the left hand "+" to add a value and rename it best.
7.Select the Object Wizards tab then select Knowledge Representation. Select Tree Knowledge representation. This enables you to create a decision tree to dictate the flow of the optimization module.
8.To instruct Knowledge Builder runtime to execute this module you should double click the Knowledge Module in Knowledge Explorer to display it in the Multiple Object Editor in the right pane on the screen. Select Main Agenda using the tab on the right of the pane. Delete all the default entries and add the command: @DO Optimal
9.From the Knowledge Explorer, right mouse click the Attributes Category and select New | Numeric_Attribute then rename it to cost. This holds the value you wish to minimise or maximise.
10.Likewise, add numeric attributes for all the inputs of your optimization task.
11.Add numeric variables for all counters, flags etc as needed by your calculations by right mouse clicking the Variables Category and selecting New | Numeric Variable.
12.From the Knowledge Explorer, right mouse click the Procedures Category and select New | Procedure then rename it to cost_prc. Double click it to open it in the Multiple Object Editor (right hand pane) and, using the script commands, develop the calculations which derive the value of cost from the input variables. NB a value must always be assigned to cost in this procedure.
13.If the calculations within cost_prc make use of any constant data then consider adding a procedure to initialise this data. Call the procedure object initData. Use script commands to assign all constant data, as required.
14.From Knowledge Explorer, right mouse click the Dialogs_and_reports Category and select New | Report then rename it best_rep. Use this report to display the required information after the optimisation process at runtime.
15.To test out your calculations and report, create a procedure called testData. Using the script commands assign a set of test values to the input variables.
16.If Optimal is not in the Multiple Object Editor then double click on it in Knowledge Explorer. Select the Decision Tree tab. Double click Empty and select best. Build up the decision tree logic (by dragging the relevant items from Knowledge Explorer) which sequentially calls initData, testData and cost before displaying the report - best_rep. The tree logic would look like this:

17.Run your Knowledge Module to verify that the calculations are working.
18.From the Knowledge Explorer, right mouse click the GA_Optimization Category and select New | Optimization then rename it costOpt. Double click on this to bring it into the Multiple Object Editor. The left pane in the editor will appear as:
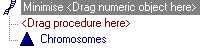
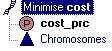
19.Drag cost across from Knowledge Explorer to Minimise <Drag numeric object here>. Also drag cost_prc to <Drag procedure here>. The pane should now look like:
20.You can now change the optimisation default settings. Until you gain experience you only need to consider the Minimise/Maximise option.
21.You are now ready to define your chromosomes.
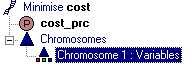
22.Right mouse click on Chromosomes and select Add chromosome. You are now given the option of selecting the type of chromosome – Sequence, Pick List or Variables. You can add more than one chromosome.
23.If you select Variables (non-sequence type) chromosome then the pane will look like:
24.Drag the input data numeric variables from Knowledge Explorer to build up the genes:
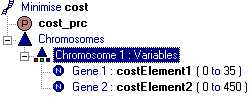
25.For each gene you can constrain the range of the possible gene values by setting the minimum and maximum values the gene can take. The precision of each gene is set by the number of decimal places defined for the particular numeric variable.
26.If you select Sequence chromosome then the pane will look like:
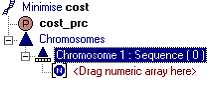
27.Drag the input data numeric array from Knowledge Explorer. If the numeric variable is named sequenceArray and is defined as an array of 10 x 1 elements then the pane will look like:

28.The number of genes in the chromosome defaults to the length of the first dimension of the array. The number of genes can be adjusted downwards in the Sequenced Chromosome properties. At optimisation time the gene values will be in sequenceArray(1), sequenceArray(2), sequenceArray(3), sequenceArray(4) etc. Each gene will have a unique value within the chromosome and in the range 1 to 10.
29.Pick list chromosomes are very similar to Sequence except that the number of genes can be different to the range. So, if the range was set to 20 then each of the 10 genes could hold values within the range 1 to 20.
30.When the Optimization object has been defined the Decision Tree of attribute Optimal needs to be changed.
31.From the Decision Tree tab of Optimal in the Multiple Object Editor delete testData and cost_prc from the tree.
32.Drag costOpt across from Knowledge Explorer and insert into the Decision tree after initData and before best_Rep:

33.Now Run the task and you should see the optimization runtime displaying the number of generations done and the best value for the cost value so far (in our case the lowest). After carrying out the default setting of 50 generations, the evolution process will terminate with the best value of cost achieved being assigned to the cost attribute. The gene values which have given rise to the best cost will also be assigned to the attributes/numeric array elements that they are mapped onto.